Email Settings & Templates
Email is a core component of most automated workflows. The platform allows you to design rich, personalized templates and manage multiple sending accounts through Email Pools to ensure high deliverability and professional communication.
1. Email Templates
Templates allow you to standardize your messaging while maintaining a personal touch using dynamic variables.
Creating a Template
-
Template Name: Give your template a clear title (e.g., "Welcome Sequence - Step 1").
-
Subject Line: Craft a compelling subject. You can use variables like
{firstName}to increase open rates. -
Email Content: Use the rich text editor to compose your message.
- Dynamic Variables: Insert placeholders like
{email},{firstName}, or{lastName}. These will be automatically replaced with the contact's actual data during execution. - Rich Formatting: Bold text, add lists, and include hyperlinks to drive engagement.
- Dynamic Variables: Insert placeholders like
-
Select Your Editor Type
- HTML: For developers who want full code control.
- Rich Text: For a standard "Word-like" editing experience.
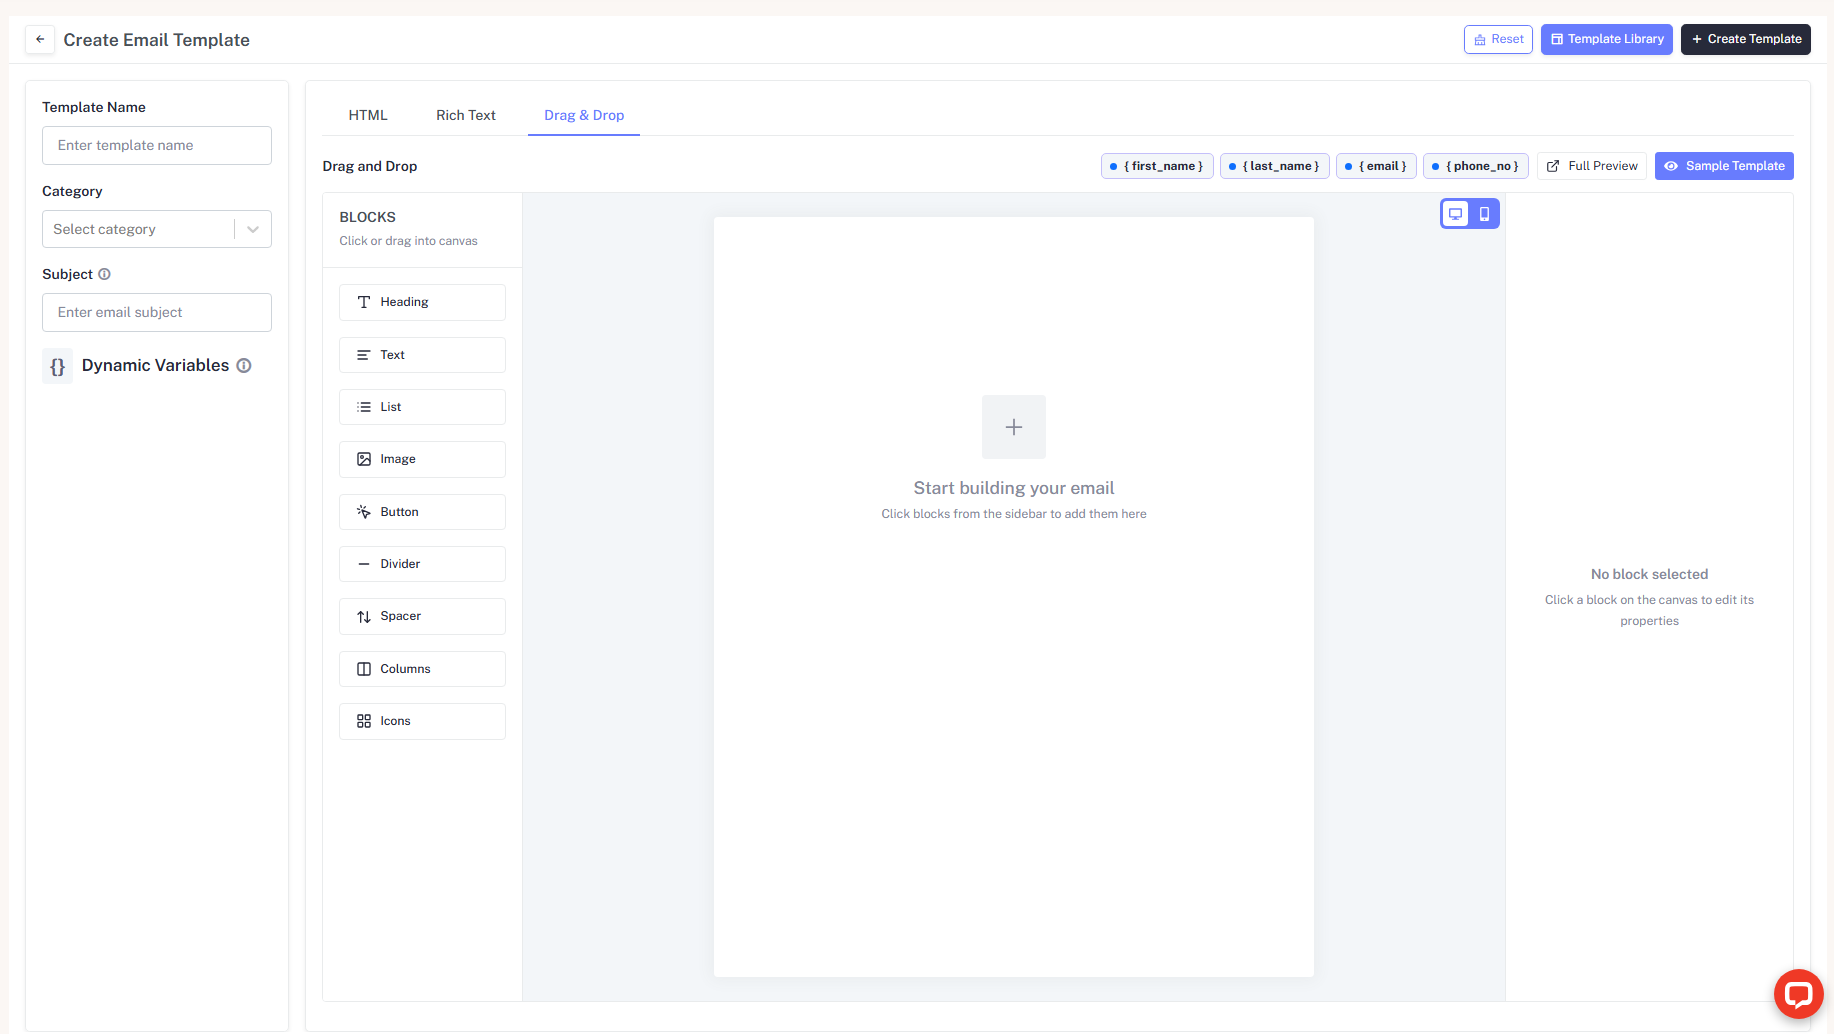
- Drag & Drop: For building visual layouts using sample structures.
Managing Templates
From the Email Templates dashboard, you can:
- Preview: See exactly how the email will look to your recipients.
- Edit/Update: Refine your messaging at any time.
- Delete: Remove outdated templates to keep your library clean.
Advanced Template Tools
Beyond manual composition, the platform provides high-speed design tools through a comprehensive Template Library and a visual Drag & Drop system with sample layouts.
Template Library (Default Templates)
The Template Library is a centralized repository of professionally designed, pre-built templates available for any editor type.
- Accessing the Library: Click the Template Library button at the top of the creation screen.
- Versatility: These templates cover common business scenarios and can be imported directly into your preferred editor.
Drag & Drop Sample Templates
The Drag & Drop editor offers a specialized way to build layouts visually using modular blocks.
- Sample Template Feature: Click the Sample Template button to load a pre-configured layout structure.
- Modular Blocks: Customize by dragging new blocks (Images, Buttons, Spacers) onto the visual canvas.
2. Email Accounts & Configuration
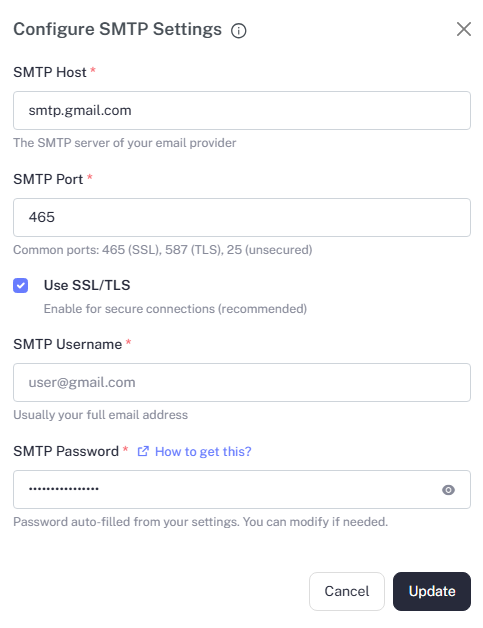
Before you can send emails, you must connect your sending accounts through the Configure SMTP Settings interface.
Supported Providers
You can integrate accounts via SMTP (Gmail, Outlook, or custom business mail).
- Outgoing (SMTP): Handles the sending of your automated emails.
- Security: It is highly recommended to enable SSL/TLS for secure connections.
- SMTP Details: Requires an SMTP Host (e.g.,
smtp.gmail.com), SMTP Port (common ports include465for SSL or587for TLS), and your full email address as the SMTP Username.
Account Health
- Daily Limits: Monitor your daily sending volume to maintain a healthy sender reputation.
- Status: Ensure your accounts are
ACTIVE. If an account shows an error, re-verify your SMTP credentials.
3. Guide How to Generate a Google SMTP Password
If your Google account has 2-Step Verification enabled, a regular Gmail password will not work. You must generate a unique App Password for SMTP access.
Open Your Google Account
Navigate to myaccount.google.com (opens in a new tab).
Enable 2-Step Verification
- Open the Security tab.
- Ensure 2-Step Verification is enabled.
Generate an App Password
- Click on 2-Step Verification.
- Find App passwords at the bottom of the page and click it.
- Create a new password for the application.
Copy and Use Your Password
- Google will provide a 16-character code (e.g.,
abcd efgh ijkl mnop). - Important: Copy this code and use it in your SMTP settings without spaces.
Note: Your regular Gmail password will fail authentication. Only an App Password is compatible with SMTP settings when 2-Step Verification is active.
4. Email Pools
Email Pools are a powerful feature for high-volume campaigns. They allow you to group multiple email accounts together for round-robin distribution.
- Load Balancing: If a pool contains 5 accounts, the platform will rotate through them, distributing the sending load evenly.
- Primary Account: You can designate a primary sender within a pool.
- Workflow Integration: When adding an Email Node to your workflow canvas, you select a Pool rather than a single account.
5. Best Practices for Email Delivery
Warm Up Your Accounts
Avoid sending 1,000 emails on day one from a brand-new account. Start small and gradually increase volume to avoid being flagged as spam.
Use Personalization
Avoid "Dear Customer." Use variables like {firstName} throughout your templates to build trust.
Monitor Reply Logic
In your Workflow Canvas, use a Condition Node after an email to check if a user has replied.
Pro Tip: You can see the real-time status of your sent emails (Delivered, Opened, Clicked) within the Monitoring & Insights section.
Formatting Check: When using dynamic variables, ensure the variable name
matches your contact fields exactly (e.g., use {firstName}, not {first_name}).